In this post, we’re breaking down the seven steps you can take to create a blog post using your preferred AI writing assistant. Keep in mind that you can tailor or adjust each of these steps to suit your business practices, minimizing or maximizing how much AI you use in each step. Overall, each step is the same, whether you’re using AI or doing it “the old-fashioned way” (i.e., doing it yourself) – the difference lies in which tools you decide to use.
For this article, we’re using ChatGPT to show you how to create a blog post step by step, but you can choose whichever AI writing assistant works best for you.
Step 1: Pick an AI Writing Assistant
Several AI writing assistants are available: Jasper AI, ChatGPT, Rytr, and many more. Do your research to find out which one is most suitable for your blog post needs.
Step 2: Choose a Topic and Create an Outline
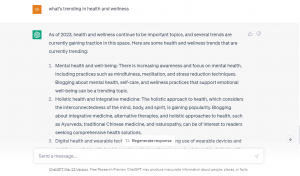
Choosing a topic for a blog post or a series of posts can be difficult. Thankfully, AI can help you if you’re feeling unsure about what’s trending in your blogging niche. Using ChatGPT, you can ask, “What’s new in _____,” and get a list of topics to write about. In the image below, you can see a sample of how ChatGPT generated an eight-point list of what’s new in health and wellness:

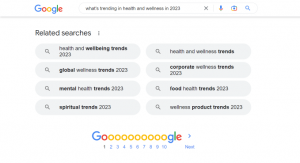
It’s important to note that most AI writing assistants have limited data on new and recent information or events (this is clearly stated on ChatGPT’s website, which will also let you know this in its response). Therefore, always check other outlets, such as online magazines, other blogs in your niche, or the “related searches” section at the bottom of your Google search results page to get a better idea of what people want to read about:

Once you’ve landed on a topic, you can let your AI writing assistant create an outline for you, or you could generate one yourself based on your total research on the topic (for example, if you needed to supplement your information with other sources on which AI may not be updated). If you opt to use AI to write an outline for you, make sure to check over all the points and subpoints for flow, cohesion, and authenticity to avoid issues in the following steps.
Step 3: Let AI Write for You
Now that you have a clear outline and a direction you want your blog post to go in, it’s time to write your blog post. Based on an outline, you can use AI in several ways to write a blog post for you. There is no right or wrong way – just use the way that works best for you. For this guide, we suggest going through your outline point by point rather than giving ChatGPT your entire outline at once.
You might ask why. Great question. By going point by point, you have more control and can fine-tune exactly what you’re looking for in a response. For example, if you give ChatGPT an entire outline and want a 1,000-word blog post, you’re sort of gambling on what points will be emphasized. Additionally, if you’re using an outline generated by AI, you might notice that they are jam-packed with information and points that could be split into many blog posts (or even compiled to make a complete dissertation!), possibly resulting in a post that is very scattered, disorganized, or simply overwhelming to read.
Step 4: Review and Edit
Whether you write a blog post yourself or use AI to write it, always review and edit your work. Editing and reviewing AI-generated text is especially important because you won’t know what it says until you take the time to carefully read and review it.
During this step, you should be checking for a few things:
- Content: Is the content suitable or what you were looking for when you designed the outline?
- Cohesion: Do the paragraphs work well together? Do they collectively create a complete and understandable post that is enjoyable to read and leaves the reader without questions?
- Clarity: Is the blog post clear? Are some points weak or missing? Could it benefit from additional information? Is there too much information?
- Accuracy: Is the content factual and accurate?
- Repetition: Do ideas or sentences repeat within a paragraph or between paragraphs?
Let’s look at a real example of how to review and edit an AI-generated paragraph. Below, you’ll first see a paragraph generated by ChatGPT on virtual reality (VR) in wellness:
The emerging use of virtual reality (VR) in promoting mind–body wellness is an exciting development in the field of health and wellness. VR technology has the potential to transport individuals into immersive and interactive virtual environments that can positively impact their mental and physical well-being. Virtual reality experiences can be designed to promote relaxation, mindfulness, stress reduction, and meditation, providing a unique and engaging way to practice self-care and promote mind–body wellness. For example, VR applications may offer guided meditation sessions, virtual nature walks, or virtual fitness classes, allowing users to escape from the stresses of daily life and engage in activities that promote relaxation and mindfulness. VR can also be used for rehabilitation purposes, providing a safe and controlled environment for physical therapy exercises or helping individuals overcome fears and phobias. The use of VR in promoting mind–body wellness has the potential to revolutionize the way we approach health and wellness, providing innovative and immersive tools to support mental, emotional, and physical well-being.
Here’s how we reviewed and edited the paragraph to better suit a blog post:
Virtual reality (VR) is an exciting development in the field of health and wellness. It has the potential to transport individuals into immersive and interactive virtual environments that can positively impact their mental and physical well-being. VR experiences, such as guided meditation sessions, nature walks, or fitness classes, can be designed to promote relaxation and mindfulness and reduce stress. VR has the potential to revolutionize the way we approach health and wellness, providing innovative and immersive tools to support mental, emotional, and physical well-being.
In the edits, we focused on shortening sentences to promote skim reading. We also focused on removing repetition so that the main idea would be clear and concise. Last, the paragraph contained too many ideas, so we removed excessive information that made the paragraph feel cluttered or overwhelming. Keep in mind that you could easily take superfluous ideas from a single paragraph and expand them into separate paragraphs.
For more information and tips, be sure to check out our article on how to edit AI-generated content.
Step 5: Add Your Personal Touch
Once you’ve reviewed and edited the first draft, it’s time to think about how you want to personalize the post so it reflects your brand. You can add your personal touch to an AI-generated blog post in many ways. Here’s a short list:
- Write the introduction and conclusion yourself.
- Add personal stories or anecdotes.
- Include quotes, figures, and stats in areas that would benefit from them.
- Include images, graphs, or charts.
- Use literary devices, such as analogies, metaphors, and rhetorical questions, to give the post complexity and make it interesting.
Step 6: Add Citations, Stats, Data, and Links
Depending on the type of content you write, you’ll want to check for text or areas that need citations, links, data, figures, and stats to back up claims and/or strengthen arguments. Be careful when using AI to generate these figures as many AI writing assistants do not have the most updated information, and they are liable to give you false information.
Step 7: Proofread
Now that you’ve reviewed, edited, added your personal touch, and included other required information from outside sources, it’s time to proofread your blog post. While proofreading, check for the superficial errors or mistakes that can reduce the quality of your blog post. Here are some things to check:
- Punctuation
- Capitalization
- Grammar
- Spelling
- Word choice
- Awkward or unnatural phrasing
If you need help proofreading your work, be sure to check out our downloadable Proofreading Checklist.
Conclusion
AI is a great tool businesses can use to produce more high-quality content with faster turnaround times. By following the seven steps we’ve outlined in this article, you can feel confident that you’re using AI to its fullest and maximizing your content production without sacrificing quality.
Interested in learning more about how to use AI in your content production? Read our article A Writer’s Guide to Using AI: All You Need to Know.
If you want to give your AI-generated blog posts a final polish ahead of publication, we also provide AI-generated content editing services.


