- 5-minute read
- 16th November 2022
How to Record a PowerPoint Presentation
If you’re a professional, chances are you’re familiar with giving presentations or will have to give one at some point. Recording presentations is a great tool, whether it’s to share the videos with remote colleagues or to watch the videos to see where you can improve as a presenter.
Fortunately, you can record your next presentation in a few simple steps, either with Microsoft PowerPoint’s built-in tool or by using a third-party screen recording tool. Check out our guide below to find out more!
PowerPoint
Microsoft PowerPoint offers a user-friendly tool that allows you to record, markup, and export a presentation. Here’s how:
1. Present Slide Show
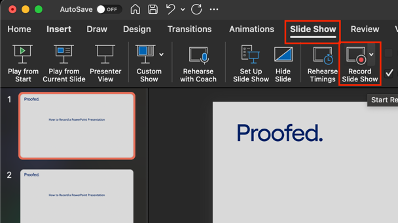
Once you’ve put together a great presentation, navigate to the Slide Show option in the ribbon toolbar at the top of your screen and select Record Slide Show.

If you’re using a Windows computer, you’ll either start recording from the start of the presentation or from your current slide. If you’re on a Mac, you’ll want to open the slide you want to start recording from before selecting the record button.
2. Utilize Recording Tools
The recording toolbar will then appear at the top of the next screen.
The tool options may differ slightly depending on your operating system, but they include options to start and stop recording, pause or delete the recording, and select whether you’d like to use a camera to record yourself during the presentation and/or a microphone to add narration.
3. Record Presentation
Once you click start, you’ll get a three-second countdown before the recording begins.
You’ll see the Presenter View during recording, which includes speaker notes on the right side of your screen and markup tools, including a laser pointer and highlighter, under the slide currently being presented:
You can progress through your presentation using the arrows on the screen or those on your keyboard. It’s important to note that narration won’t record over slide transitions, so you should pause speaking until transitions have completed.
4. Save and Export
Once you’ve reached the end of your presentation, you should click Stop on the toolbar and then End Show on the left side at the top of your screen.
Next, navigate to the File menu option to save and export your video:
Once you’ve selected your desired file format, you can choose video quality and timing settings before exporting:
5. Watch and Share Your Presentation
Find this useful?
Subscribe to our newsletter and get writing tips from our editors straight to your inbox.
After the export has completed, you’ll have a complete recording of your presentation, including all narration and markup!
Loom
If you’re looking for another tool for recording presentations, Loom is a third-party screen recorder that you can use in a web browser or on your desktop. You’ll first need to sign up for free and then download the desktop app to use it with PowerPoint.
1. Setup Recording Tools
When you first open Loom, you’ll see a toolbox with camera, microphone, and screen recording options:
You can choose to record your entire screen or just one app, like PowerPoint, and you can also create speaker notes that will only be visible to you.
2. Record Presentation
Once you click Start recording, like PowerPoint’s tool, you’ll be given a three-second countdown, and then you can navigate to play your slideshow in your desired view (i.e., standard or presented).
Note that although PowerPoint can create a video of only the slide show and none of the presenter’s view, Loom creates a recording of your screen exactly as you see it.
When the recording begins, a toolbar will be added to the left side of your screen with similar options to start, stop, pause, delete, and markup:
3. Save and Edit
Once you’ve reached the end of your presentation, you should click Stop on the toolbar. Loom will then automatically save a copy of the recording and redirect you to your library on their website.
From here, you can use the settings menu on the right side of the video to make any necessary edits, such as trimming the recording.
4. Download and Share
Next, you can click on the three dots above the video to either download the recording or copy a link to it, which you can share with anyone you want to send your presentation to:
Proofreading and Editing
Before recording and sharing your presentation, don’t forget to proofread it, as spelling and punctuation errors can come across as unprofessional. Our expert editors can help ensure your presentations are clear, concise, and error-free, and we can work in over 15 document formats! Learn more by submitting a free trial document today.
And if you want more help with Microsoft Office, check out our MS Word series on YouTube, where we’ll add videos with helpful tips, like how to create a list of abbreviations in Word on a Mac.


